
Optical Microscopy is affordable and provides plenty of information for art documentation and examination. Though, my feeling is that it has been overlooked in academia and in education for conservation scientists and probably also for conservators. You don’t want to shoot a mosquito with a cannon, right? A good enough polarizing microscope goes for $5000 (much less on the used market) and it lasts forever. There has been a bias toward new, fancy and costly instrumentation and Optical Microscopy has been put aside just because it was not fancy enough. In my experience, I was never taught how to use an optical polarizing microscope – nevertheless to take samples and prepare cross-sections. I had to figure out it myself and I really enjoyed reading W. C. McCrone’s papers – a beacon in the field [1, 2]. This thought is shared by others [3]. I really hope that students would be taught how to use basic, affordable, scientific tools and not just the fancy and expensive ones.
Cross-section preparation
This blog is about cross-sections preparation. They are useful for painting conservation and authentication. Warning! The epoxy resin and the hardener are toxic, you must wear gloves and a mask when handling them. This video should be self-explanatory about how to make cross-sections from paintings. I found this resource very useful published online by Orion Analytical [4]. I’m going to cover other “microscopy and art” topics in the following blogs.
Materials you need (this is just my personal list of materials):
- stereo microscope
- EpoxiCure Epoxy Resin 20-8130-032 Buehler 0.95l
- EpoxiCure Epoxy Hardener 20-8132-008 Buekler (o.24l)
- 8” microcloth PSA 10/PK Buehler 693-3
- 8” Carbimet 2 abrasive paper 600/P1200 Plain back Qty 100 PN: 30-5108-600-102
- 8” Carbimet 2 abrasive paper 400/P800 plain back Buehler PN: 30-5108-400-102
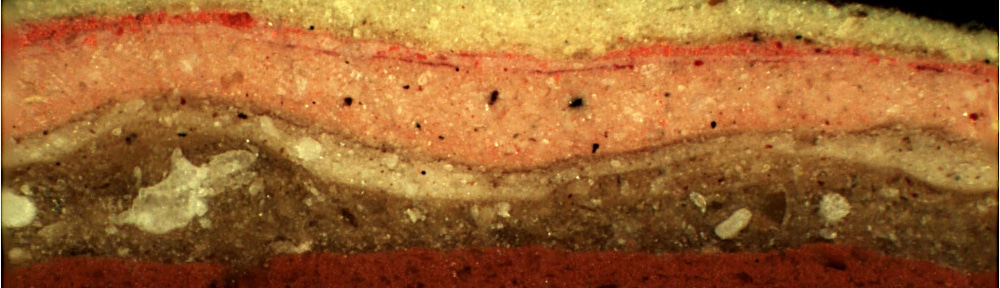
Cross-section 100X. Madonna and Child, attr. A.R. Mengs. The KODE museum in Bergen, Norway.
[1] W. C McCrone (1982) “The Microscopical Identification of Artists’ Pigments” Journal of the International Institute for Conservation—Canadian Group 7 (1–2):11–34.
[2] W. C McCrone (1994) “Polarized Light Microscopy in Conservation: A Personal Perspective” Journal of the American Institute for Conservation, Vol. 33, No. 2.
[3] R. Weaver (2003) “Rediscovering Polarized Light Microscopy” American Laboratory, October.
[4] Orion Analytical, “Preparing layered samples for microscopic examination in cross-section” http://www.orionanalytical.com/Preparingcross-sections.pdf


Hello Antonio,
i like your video, very good explanation for easy and affordable microscopy. Just a few questions and remarks I have, maybe it is useful.
– Do you think the superglue affects the sample?
– The epoxy resin and especially the hardener are very toxic, it is advisable to use gloves to do the mixing and wear a mask with carbon filters.
– The filling of the container can be done away from the microscope (think about accidental spills)
– When grinding the samples you can use shellsoll D to cool the sample during the grinding, it makes grinding easier also. (If you are expecting wax layers, this cannot be used.)
best,
Merel Lantman
Hi Merel, thanks a lot for your comment. You are definitely right about gloves and mask. I did edit the post and the video with warning for anybody to take care while handling chemicals. This is a main issue and I should have mentioned it already in the post. Thanks for the shellsoll D suggestion. I wish I could try it soon.
RE Superglue, I read others do use it. Then, i think it should not be a big issue since you remove the first layer with the glue when you grind to expose a flat surface.
Ciao Antonio
congratulazioni per il bel sito web. Ho visto il post per la preparazione dei campioni da osservare in sezione e poiche’ mi piacerebbe osservare una patina di un bronzo antico mi chiedevo se la tecnica e’ la stessa. Ma poi osservando bene ho capito che il tuo microscopio e’ quello a luce polarizzata mentre io ho un Motic BA210Led e quindi quello classico per biologia/medicina. E’ corretta la mia osservazione?
Per intenderci quello che hai usato tu e’ un microscopio di quelli petrografici a luce riflessa. Corretto?
Grazie. Felice
Ciao Felice, grazie dei complimenti per il CHSOS!
Per l ‘esame dei pigmenti nelle sezioni trasversali uso un microscopio con luce riflessa (anche polarizzabile). Per l’esame delle patine non ho esperienza, purtroppo. Saluti, Antonino
Can somebody help me? I am a Ph.D. student working on how to calculate the cross-section of the yarn for my project.
I have viewed the yarn cross-section under a microscope. what l saw shows that the yarn did not collectively conglomerate around themselves, rather some of the fiber moved far apart from the center of the yarn. Which are of the picture should l concentrate for the yarn CSA