
 We do run a lot of initiatives, Stay on top of things!
Contributed by Camilla Perondi and Giacomo Vianini
In this post we want to talk about Photomodeling, that is the creation of 3D models from 2D pictures taken with an ordinary camera. This method is a cost-effective alternative to laser scanning , for fast documentation and survey, and the final model can be easily exported and shared. It doesn’t mean that it needs less attention: the choice of shooting device , the illumination, the viewpoints from which catch the photos, the number of shots and their quality required a certain degree of accuracy instead.

First of all, it is necessary to choose the right device to capture the images: nowadays the market offers several typologies of cameras, from the digital compact ones to the so-called “bridge” and single-lens reflex cameras. For the creation of our 3D models, we have chosen the latter kind of camera, because it permits a high control on exposure time, focus, output file and other facilities for image quality control.
The photo-capture must take into consideration every detail of the object, thus, the more the complex and detailed the object, the more the images should be taken. Remember to keep an overlapping of at least 1/3 of the scene between each photo, in order to facilitate the reconstruction process.
Once the shooting is finished, the choice of the software may take two main directions:
- The use of a freeware (i.e. 123D Catch and Recap Photo, both developed by Autodesk)
- The use of a licensed software (Agisoft Photoscan)
The first ones offer a totally automatic process, in which the calibration of internal parameters and the camera orientation, the principal moments of 3D reconstruction of the scene, are all managed by the server, which then proposes the final result on the online application.


These models can then be edited or reprocessed for a better quality of the polygon mesh (the collection of vertices, edges, and faces that define the object shape), although they don’t offer models with a good quality texture (the object skin, carrying the color information). Moreover, note that model processing may take from few minutes to some hours.
The choice of a licensed software such as Photoscan brings the work to a high control of a number of parameters, either in the alignment phase (calibration and orientation of the cameras), and on the geometry building-up phase, and finally on the realization of the texture. Moreover, the software allows some other editing procedures, scaling of the model, and most of all the exportation of an orthophoto for further measurements in CAD environment.

The great limit of Photoscan is that the models exported in the .obj format are actually split into two files: the .obj carries the information of the mesh, while another file (usually an image) carries the texture information. This is translated into the difficulty to upload the model in a 3D viewer online without losing the original high quality.
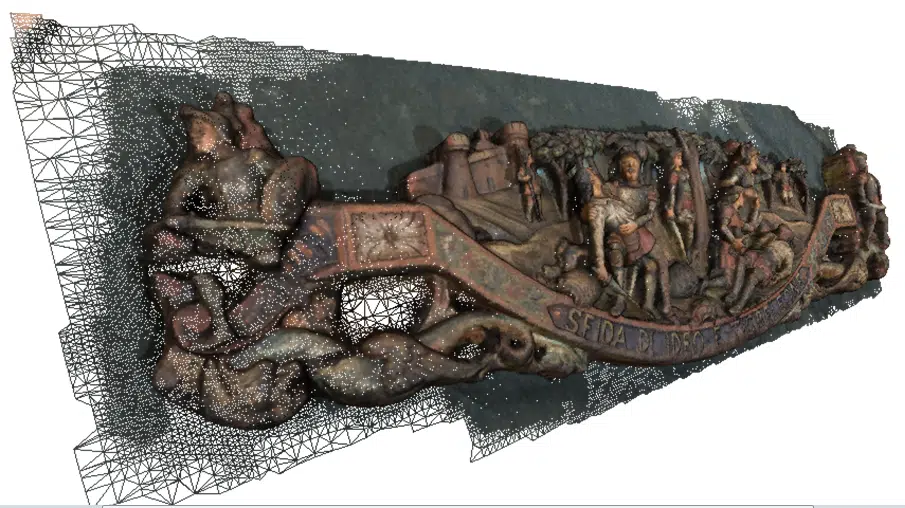
Prove Rhino.zip from giacomo.vianini on Sketchfab.
The software listed here permit all to export the 3D models in the most common file formats used in the field of 3D graphic (i.e. .stl, .obj, .ply, .3ds, .dxf).


Firstly, Antonino and Camilla, thanks for introducing this topic into your blog.
This is a topic that I have been involved with for some ten years or so.
Like so many computer related imaging topics, it is sold to us as by the software manufacturers as quick, easy and foolproof, while in truth it is none of the above.
Having spent many years producing QTVR 360 degree objects and VR panoramas, I was most interested in the potential of converting scenes and objects to true 3D by the use of photography.
The range of software solutions tried over the years is quite wide, ranging from free to very expensive and from more to less successful.
A brief and partial list of such includes:
• Autodesk Image Modeler
• Autodesk 123D Catch Webservice
• Autodesk Recap Webservice
• Eos Systems PhotoModeler
• Eos Systems PhotoModeler Scanner
• D-Sculptor (discontinued I think)
• iModeller (discontinued I think)
• 3D SOM
• Strata Foto 3D
• PhotoSculpt
• AgiSoft PhotoScan
• AgiSoft StereoScan
• D Sculptor (discontinued I think)
• ARC 3D Webservice
• my3dscanner Webservice
• SketchUp photo texturing (primarily for Google Earth buildings)
… and I have surely forgotten others used over the years. In addition, I assume there is other software out there which I have not yet tried.
Generally, the solutions may be broken down by several different parameters:
• Photographic approach
• Stand Alone versus web based software
• Object 3D versus Scene capture.
Photographic approach
Here we may differentiate between the method of calibration used to synth the images and create the wire mesh. Sotware like 3D SOM, Strata Foto 3D (which is basically a light version of 3D SOM), iModeller, D Sculptor, etc. all require that the object be placed on a calibration mat/grid, which is also calibrated to the camera lens.(Strata Fhoto CD 2.0 allows the use of manually placed markers for objects which dont fit on a grid).
The required photographic process is very stringent and all images must be masked out from their background prior to the mesh formation, which is based on multiple traces of the 2D silhouettes, juxtaposed with the image of the calibration grid. The software creates a controllable mesh, a flat shaded model and finally a texture map.
See result at: http://sketchfab.com/nk4ih2ec0
If very great care is taken at the photographic and masking stages, the results can be remarkably good. However, I find that these systems work best with soft rounded and irregular shapes, without sharp edges. Geometric objects tend to look like they came out of the microwave after several minutes.
As opposed to this approach, software such as 123D Catch, ARC 3D, Recap, etc. are far more lenient in their approach. They don’t demand the same level of accuracy in the shooting process (though still better is better), nor do they demand masking out the image from the background. Actually, to the contrary, it is to a large extent the background, with as much detail as possible, which gives the reference points upon which the images are aligned and fused.
My experience with this approach is that one should expect the unexpected. Sometimes the results are exceptional, (see: Plaster Head – http://sketchfab.com/nk4ih2e10b), and sometimes much less so, with lots of holes in the model.(http://sketchfab.com/nk4ihgedca).
Stand Alone versus web based software
Here, the difference in approach is simple and clear. The stand alone software is available for purchase, usually for Windows (3D SOM) and sometimes also for Mac (Strata Foto 3D). Prices vary, but the software is generally speaking not cheap. The exception is Strata Foto 3D S.E. (Mac only), available from the Apple Store for a very good price and the software is fine.
The web based services, Recap, 123D Catch, Arc 3D, my3dscanner, etc. tend to be free… at this stage. I suspect that this may well change in the future.
Also, the web services don’t all allow the same level of control during the model creation stage. Basically, the photos are handed over to the service server and from then on its a question of waiting and hoping for the best. Often, the results are unusable. Sometimes even no results return at all, instead just an error message.
That said,
123D Catch is a special breed of software in that it is offered as both a downloadable stand alone tool (Windows only), a web based service and a mobile tool for the iPhone/iPad. The stand alone version offers the greater level of control in my opinion.
Recap Photo is a new product from the Autodesk line and basically does the same as 123D catch… only better. The algorithms for meshing and texturing seem to have improved quite a lot. I have run the same image files through both tools and the improvement in Recap Photo is quite noticeable. In both cases however, the output needs a lot of post processing, primarily to remove unwanted background artifacts and to fill or smooth holes in the model. Here, 123D catch has a slight advantage, as it includes basic editing tools. Recap does not, however the exported obj model can be further processed in most 3d editing software. Autodesk themselves have just released a free beta 3d editing tool called Project Memento ( http://labs.autodesk.com/utilities/memento). It accepts both the OBJ and the native Recap Photo output (RCM) and does a very good job.
Object 3D versus Scene capture.
In my opinion, the quality achievable today with photomodeling software is more advanced in the object capture field than in scene capture. A possible exception to this claim are the really advanced tools, such as AgiSoft PhotoScan and PhotoModeler by Eos Systems. These can achieve quite impressive results. However, the process is not easy and the price is not cheap. Autodesk 123D Catch promises easy scene capture. I however has not achieved good results so far. Maybe this is more a fault of mine than of theirs. I have yet to seriously try Autodesk’s Recap Photo for scene capture. Autodesk also have a more advanced tool called Recap Photo Pro, which works both with photos and laser scans. I have not yet tried it and would be most interested to hear from others who have used it.
Stereo Scanning Software
This technique is remarkably simple and in some cases can yield very good results (see: http://sketchfab.com/nk4ih2fdcb). Of the two software tools that I have used so far, I find AgiSoft StereoScan better than PhotoSculpt. It is also free. That said, it is best to try both, as sometimes one give a better result than the other. Obviously, this approach is only good for recording shallow reliefs and not fully 3D objects and scenes. It is based on good old fashioned photogrammetry and as such it is great within the said limitations. I have also found that in this case, 123D Catch and Recap Photo can also give excellent results. The advantage being in the fact that unlike the true stereo software, 123D and Recap are not limited to a stereo pair of pictures only. As a result, one can get greater coverage and steeper angles of view. (See: http://www.123dapp.com/FullPreview/Index.cfm/ID/1673927)
3D Scanning
Finally, I think we are heading for exciting times. along with a steady advance in photomodeling algorithms, web services and even mobile hardware software combinations, one should closely follow the parallel advances in 3D scanning. There the prices are coming down and the results are going up. Along with the high end very expensive 3d scanners on the market, we are beginning to see cheaper and better alternatives. The NextEngine started off the revolution with a $3000 laser scanner. The David System offers a very impressive dual approach of both laser and structured light, both using the same David software (see: http://sketchfab.com/nk4ih2e1c). Other systems are coming on the market offering better and cheaper solutions. And then, of course, there’s the Kinect revolution. This simple XBox game tool is rapidly proving that with the right software it can offer a viable fast and cheap solution to 3D scanning (see: http://sketchfab.com/nk4ih2ed0b). Companies such as Kscan3D , Farow Scenect, ReconstructMe, and many others are just a few of a growing breed.
Watch this space. There will no doubt be be exciting advance in the coming months.
For more 3d photomodeling and 3d scanning results, visit my Sketchfab folio at: https://sketchfab.com/mosheca/
That’s it for now.
Look forward to feedback, ideas, suggestions and more goodies.
All the best.
Moshe
Hi Moshe,
I first of all thank you for the exhaustive comment!
It’s evident you have a wide experience in this field, and that’s what is actually required to perform 3D digitization in order to choose the best photographic conditions and software.
Giacomo and me are approaching to 3D photomodeling since just a couple of years, and we are aware of both the great number of software available and the several parameters to be considered during the shooting. Nevertheless, solely one blog post is not the right place where to describe in details an efficient “how to”!
I guess you may have a fruitful exchange of ideas with Giacomo, who’s working on models of archaeological tombs and graves! 😉
Hello Camilla.
Yes, indeed. This is a topic which demands a fair amount of experience and experimentation. The blog, as you say, can not provide all the answers, however it may provide a good platform for a rapid exchange of ideas, updates, tips and so on.
I should be happy to help you and Giacomo in any practical questions or problems you encounter. Tell me more about your (joint?) project. Are you students of Antonino? Is he your supervisor?
All the best.
Moshe
Hi again Camilla and Giacomo.
I’ve been delving deeper into Autodesk Recap . Spent countless hours experimenting and discovering the good, the bad and the ugly.
Firstly, it is an impressive program. The mesh algorithms are a major improvement on 123D catch. I have run the same image sets on both programs and the results are consistently much better in Recap. This of course raises the question … why?. Both programs are products of Autodesk, so one may assume that what they can do with Recap they could also do with 123D catch. My unsupported feeling is that they are aiming to create two distinct niches:
123D Catch, lightweight, low res, limit on image quantity, basic and free for the hobbyist.
Recap, high res, high volume mesh, no limit on image count, … and NOT free.
I, for one can live with that and even think it is quite fair.
However… Until then, there are still some major issues to be resolved until Recap can be of real use in a professional workflow.
Firstly, greater manual control over the process, in order to further fine tune the mesh.
Secondly: Built in editing facilities, similar to but better than 123D Catch, to clean up the mesh, discard the many unwanted bits, fill holes, smooth, flatten, fill etc.
Thirdly: Advanced export options to the major 3D formats.
Fourthly: It would be better to have a stand alone program, rather than a web based service. Professional users would not wish to be limited to a web connection and have all the material out of their control. Of course, there is also the issue of non disclosure which many professionals have to work with. This makes sending files off into cyberspace a rather daunting and possibly even illegal issue.
At present, all the above has to be done in external programs and my experience so far is that it is a real pain.
I do not own Maya or 3D Max (very expensive and complicated) and think that anyway those programs are an overkill for the above .
Meshlab, which is in principle an excellent program, seems to have a strange love hate relationship with Recap files exported as OBJ. In some cases it imports them, texture and all, where one may clean it up. In others, it only imports the mesh and steadfastly refuses to accept the texture map. In other (many) cases, it crashes altogether when attempting to import.
I have also noticed that recap sometimes creates a single texture map and in other cases it splits the texture into two files. I have yet worked out how to merge the two textures into one, if it possible at all. If anybody out there knows how to do so, please comment on this forum.
Autodesk have recently released a beta version of a mesh cleaning tool called Project Memento. The software seems very nice, though rather basic. The main limitation with it at this stage is that it exports the OBJ files WITHOUT the texture map. That means that in order to rebuild the cleaned up model again, one has to combine the old texture map (or two maps) with the new mesh. I have tried unsuccessfully to do this is several tools, including the very nice Sketchfab web site. Again, if anyone has a simple solution, I’d be really happy to hear.
So to summarize, things are looking very promising on the photomodeling front. However, to quote the donkey from Shrek, “Are we there yet?” to my mind, no, not yet.
Hi Moshe,
first of all we apologize for replying you so late, and personally I’d like to thank you for the interest in our work. Then I’m going to aswer your questions: we are not a students of Antonino (Camilla met him thanks to his website and attended his intensive course this summer), I’m a student in Archaeology (Univerisity of bologna), specializing in Structure from Motion surveys for the cultural heritage field. Moreover, with Camilla and another girl (Valentina), I’m leading a business idea focusing on multispectral and 3D digitisation of cultural objects for their both analysis and valorisation through innovative multimedia technologies – among which “pseudo-holograms”: http://www.youtube.com/watch?v=1s0xPZ7IRj4.
About the SfM software you talked about, I feel the same: I guess that ReCap and Project Memento are freely available until Jen 2014 in order to achieve sufficient feedback from the users and then implement the services in just one product. Not for free, obviously. 123D Catch seems to cover a wider public, while ReCap may offer higher quality models despite it doesn’t offer control on the parameters of model construction.
I also agree with you about the experiences of importation/exportation of .obj files and the correct application of the texture on the mesh. We’re hardly working on that (just from the practical point of view, without treating the algorithms!), and part of my thesis work is actually that.
By now (I talk upon my short experience) there exist several software that haven’t been tested yet, but the best I work with are surely ReCap Photo/Project Memento for fast results, and PhotoScan for more controlled and detailed works. Moreover, I find thet Rhinoceros is a good tool for post-processing the 3D models created with other platforms. Provided that I consider AutoCAD the worst CAD software ever (its cost is too high and doesn’t permit the management of 3D data: it incredibly crashes!), Rhino allows measurements on the model after appropriate scaling instead.
I’m very happy that a high-level expert like you has shown interest in our experiences, and I’m impatient for discuss again about software and algorithms (I’d like to know more about the latters for SFM).
Best Regards
Giacomo
Hello Moshe
Thanks for the info. I was wondering if you could help me with some questions on 3 photomodelling?
Hello Chris
Yes, I’d be happy to help you. What is your question?
Moshe
Hello Moshe
Thanks for the info. I was wondering if you could help me with some questions on 3 photomodeling?