
I’m sharing in this post the Technical Photography images of my Historical Pigments swatches collection painted with gum arabic. I used a Nikon D800 36 MP modified for UV-VIS-IR and the set of filters for multispectral imaging described here. All the images are shot RAW and then edited in Camera RAW.
VIS (Visible). Be sure to shoot RAW, add a color checker target and follow calibration of your camera and monitor as described in my post. I’m using a modified AIC Photo Documentation Target. I added on the right two stripes – one of zinc white and one of cadmium red – which I use respectively for calibration of Ultraviolet Fluorescence and Infrared Fluorescence. Camera RAW editing: I adjust the exposure in order to have color checker’s black swatch at RGB 60 and white swatch at RGB 230. This is an arbitrary set of values which I implemented to have standardized IR False Color images.
[ws_table id=”4″]
American institute of Conservation Photo Documentation target upgraded with a stripe of zinc white and cadmium red for calibration of Ultraviolet fluorescence and infrared Fluorescence.
UVF (Ultraviolet Fluorescence). Camera RAW editing. Camera Calibration: adobe standard. I noticed the custom calibration of the camera, see this post, doesn’t provide a good rendition of the UV fluorescence image. Temperature =15000, Tint =+70, in order to render the characteristic yellow ultraviolet fluorescence of zinc white which I use as a reference.
UVR (Ultraviolet Reflected). Camera RAW editing: Saturation = -100 and exposure adjusted to have the black and white swatches at RGB 30 and 50 respectively. If no infrared light is passing into the camera, as should be, the color swatches in the AIC color checker are all dark. Compare the same color swatches with the infrared image as well as the zinc white and cadmium red stripes. I’m saying this because the Wood’s glass in the UV lamp allows through UV and IR, so you must be sure your on-camera filters stop both UV and IR.
AIC Photo documentation Target. The color swatches in the UVR are dark indicating that no infrared is reaching the camera. The cadmium red stripe is used to check exposure for infrared fluorescence.
IR (Infrared). Camera RAW editing: Saturation = -100 and exposure adjusted to have AIC PhD Target black swatch at RGB 50 and white swatch at RGB 200. This is an arbitrary set of values which I implemented to have standardized IR False Color.
IRR (Infrared Reflectography). I use an InGaAs Camera Merlin Indigo System. Images are collected with a frame grabber Imaging Source DFG/USB2Pro. Stitching is done with PTGui Pro. As you can tell comparing IR (done with a digital camera) and IRR (InGaAs camera) more pigments become transparent, such as Prussian blue, azurite, verdigris and yellow ochre. It’s interesting to note that smalt, cobalt blue, and cobalt green become more opaque. Indeed, just a few pigments, such as smalt, have a particular transmittance curve. They are more transparent in the closest digital IR than in the IR Reflectography range. This is a good point to consider the two techniques complementary.
IRF (Infrared Fluorescence). Camera RAW editing: Saturation = -100 and exposure to make cadmium red swatch in the AIC PhD Target with RGB 30.
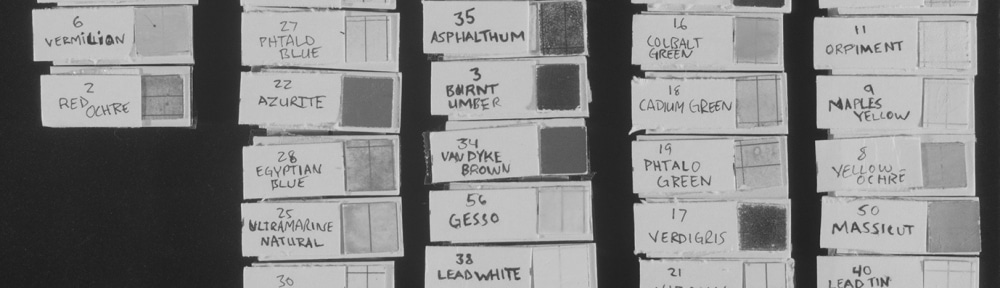
Historical Pigments swatches. Visible (normal ) photography. Historical Pigments swatches. Ultraviolet Fluorescence photography. Zinc white on the bottom exhibits its characteristic yellow UV fluorescence. Historical Pigments swatches. Ultraviolet Reflected photography. Titanium white and zinc white – modern whites – are immediately distinguished from the historical lead white. Historical Pigments swatches. Infrared photography. Most of the pigments become transparent. Historical Pigments swatches. Infrared Reflectography with InGaAs camera (900-1600 nm). More pigments become transparent at longer wavelengths.
I didn’t notice any loss in transparency using InGaAs camera compared with the Vidicon I previously owned. I got below a Vidicon image of the same collection of pigments.
Historical Pigments swatches. Infrared Reflectography with Vidicon tube. Historical Pigments swatches. Infrared false color photography. It helps with the identification of pigments. Historical Pigments swatches. Infrared Fluorescence. It helps with the identification of cadmium pigments. The brighter spot is Egyptian blue.


Hi Antonino.
Great article. Admittedly a bit over my head, but then I’m not an imaging scientist, just a photographer.
You outline the various tests and results. Do these lead you to any specific conclusions and practical recommendations?
All the best.
Moshe
Hi Moshe, The goal of multispectral imaging is actually very practical. Indeed, I did not cover it in this post since I wanted focus just on introducing the standardization processes I’m using. Imaging helps in the identification of pigments. For example, as you can tell from the images in the blog. IRFC allows to distinguish azurite from ultramarine. This is useful studying medieval and Renaissance art. UVR distinguishes the historical white lead from modern whites such as titanium white and zinc white. IRF allows to identifies cadmium pigments. And so on.
Great post! Is the NIR fluorescence induced by a vis-LED?
yes it is. There is a post specifically on the lamp for IRF imaging.
Hello,
thank you very much for your article! I am a painting restoration student and I would like to ask – do you by any chance know about a publication or a good source where I could find both historical and today pigments (plus maybe other materials used in painting such as various varnishes, gesso…) photographed in VIS and UV light? Do you know about somebody who conducted applied research on identification of old pigments using photographic means that could be usable in everyday restoration practice? Thank you a hundred times for any hint, I have been searching everywhere, but could only find your pictures on this site.
Hi Maja,
I suggest you to have a look at this paper
A. Cosentino “Identification of pigments by multispectral imaging a flowchart method” Heritage Science, 2:8, 2014.
http://www.heritagesciencejournal.com/content/pdf/2050-7445-2-8.pdf